|
More News About My Baja 12th June 2001
I have completed cutting and welding my front end adjusters. I had to cut the adjusters out of the old front end, and weld them into the new front end. A good friend leant me his cold saw which made things a lot easier.
I also managed to build most of my lift kit. I am building it out of 50x25x1.6mm RHS. I would have liked 50x35 or 50x30, but I couldn't find any suppliers. But 50x25 will be fine.
I had the body proped up in the air so that I could use it as a template for the side pieces. I made multiple cuts where it had to curve near the front. Then I bolted it in place, and welding it while it was still attached to the body.
For the rear piece, I built it on the pan. I am buying a cast aluminium front piece from SharpBuilt. I will try to post some pics in a couple of weeks. I am sick of drilling holes (for the lift kit).
More News About My Baja 18th June 2001
I went to the 2001 VW's, Fast Fours & Rotaries Jamboree on saturday, which was an all day and night event. I woke up late Sunday, so I didn't get much of a chance to work on my car.
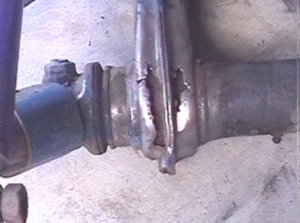
I basically just checked a few things, look at what I still needed to buy, and done a bit of welding. My car had a clutch cable access hole cut into the tunnel (near the peddles) with an oxy torch. The oxy left a very rough edge. I decide that instead of welding the hole shut, I would just clean it up and strengthen it. It is a very handy hole to have, it makes changing clutch cables very easy. I bend some 10mm solid bar to the same shape as the hole, and joined the ends in the middle of a straight section. I then welded the bar/loop around the edge of the hole. I believe it has restored the tunnel to it's original strength. I will try to post a picture.
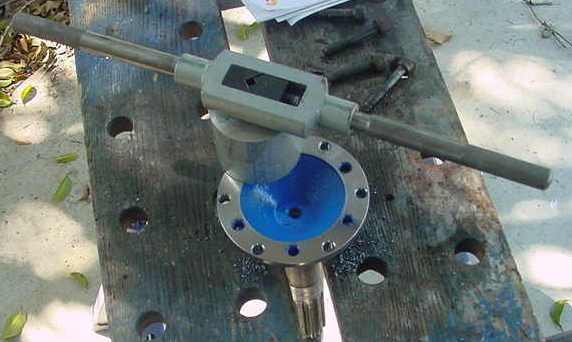
I spoke to Mike Sharp today, and my lift kit front yoke and gearbox mounts are on their way. I will be playing with them next. I have also been looking at different peoples designs for ball joint rebound stops.
More News About My Baja 25th June 2001
I recieved my lift kit yoke and gearbox straps during the week, so I have been playing with them. I am going to make some slight modification to them, but they're pretty good. They use the stock vw front and rear rubber mounts, but with a front and rear strap as well. The only part I'm going to change is the rear section that bolts to the gearbox. It is designed to use the stock engine to gearbox bolts, which is fine strength wise, it will just make putting the engine in a pain, because the gearbox and gearbox mount bolt holes might not line up exactly, which would be a pain when trying to lift an engine in. I'm just going to weld a support between under the bellhousing to ensure the bolt holes stay aligned when the engine is out.
My girlfriend helped me out heaps over the weekend. She decided to help me because I kept complaining how my car building buddy Rhys (who owe's me a few weeks of friendly labor) has gone over to England and can't help me. She painted a few parts, including the interior part of the floor pan with black kill rust. I made her do it with a paint brush rather than spray painting, as I find it sticks better to slightly dirty surfaces if you brush it on. It was slightly dirty from some previous welding and grinding.
After the painting she had a go at sand blasting. She seemed to like it. She sand blasted my fuel tank, spring plate cover plates, rear brake drums, and stock rear gearbox mount piece. Thanx Meegan.
Meanwhile I seam welded my front end, welded on some rods and gussets (for rebound limiting), and generally finish off the front end.
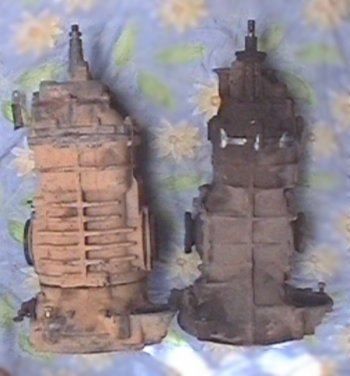
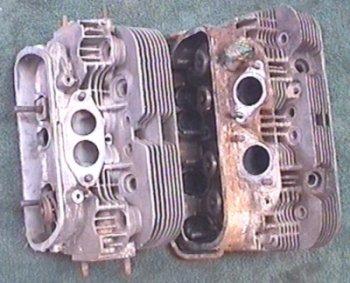
I also painted my newly rebuilt 5-rib type II gearbox. I decide to take it to Leons VW at coopers plains to have it checked out, Since I had a feeling it wasn't as healthy as I was first led to believe. In the end it needed four new synchros, a new pinion bearing, gaskets, bushes, selctor bits and pieces,and some machining here and there. I also go all the gears back-cut so that it will never jump out of gear (which is a rear pain in australian soft sand, or trying to climb huge hills). I quickly found out how expensive type II gearbox parts are. At least it should survive the 1915, unlike my 3 broken type 1 gearboxes (2 diff's and a reverse, yes I know reverse is weak and I should've been more careful).
I also done some grinding and welding on the floor pan. Since I had my gearbox and my gearbox mount kit, I could fit it in and see what needed clearancing. I clearanced the horns where needed, and seam-welded the clearanced sections. Someone had also cut access holes for the handbrake cables, so I welded them closed as well.
More News About My Baja 3rd July 2001
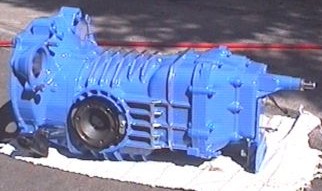
I have posted 2 new pictures at the top of this page.
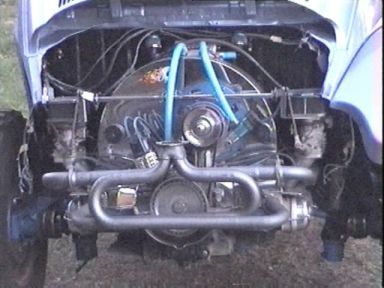
As you can see the front end and gearbox are painted. The front end now has adjusters, tower gussests, mig welded originally spot welded seams, and pins with gussests to be used for rebound limiting.
The gearbox is blue, with silver ribs. I have place it in the chassis a few times to trial fit it. I have found that I will have to make my own clutch cable bowden tube bracket for the gearbox, as the original kombi one is in the wrong spot.
I welded extra supports on the rear gearbox mount to ensure the engine bolt holes stay lined up properly.
I have bought all of the rubbers and stuff for my car. It took a few weeks to find all the pieces I needed.
I also spent ages cleaning the 8 kombi CV's I have to try to find the 4 best ones. 2 of them look quite new, real shinny balls and no grooves in the races. The other two will be harder to pick. I have only found one that I definitely wouldn't use due to pitting in one ball and it's corresponding race grooves.
More News About My Baja 9th July 2001
I have found out that I may have to go to Hong Kong for 3 weeks for work at the start of August, which would mean I would miss Valla, which would be very disapointing. I am awaiting further news.
I finished off my lift kit over the weekend, and painted it black,
I also played with my suspension to check axle length,
I bolted my front end on the floorpan,
I painted my rear arms and spring plates,
I spent a while trying to figure out what to do about my clutch and throttle cables. The bowden tube won't fit with the type II gearbox as it is too long, so I decided to cut the tube that comes out the back of the floor pan a little bit shorter. I still haven't decided what to do about the throttle cable. It needs an outer tube, as it will rub & cut into the gearbox without one. I also have a feeling a stock cable may be too short, but I will have to wait and see. I would like to make a flexible outer guide cable, like the clutch bowden tube. My L bug has a standard vw one, but I can't find another one, and I think it would be too short anyway.
More News About My Baja 16th July 2001
I have found out that I am going to Hong Kong for 2 weeks, leaving the monday morning after Valla. So that means that I will have to leave Valla on Sunday arvo.
Well things are getter closer, and my car is still in many pieces. My friend who is painting the car is really slack, and hasn't painted it yet. So I'm getting quite nervous.
I have bolted the gearbox into the pan. The gearbox mount kit took quite a bit of modification to get right, or how I wanted it anyway.
I had to shorten the clutch cable tube where it came out of the pan so that the bowden tube would have the correct bend in it (because the bracket on the type II gearbox is further forward than on a beetle gearbox).
Then I had to figure out what to do about the throttle cable. Because the type II gearbox is 2 inches higher, the throttle cable would rub on it (and eventually cut through it). I ended up getting some 8mm ID steel tube, putting a few bends in it, and attaching it to the steel tube coming out of the back of the tunnel. The bends are such that the tube steps up 2 inches to clear the top of the type II gearbox. Unfortunately this puts a little bit of extra resistance on the throttle cable.

I pull my clutch and prssure plate off my engine for a quick inspection. I noticed that grease from the gland nut bearing had come out and got onto one side of the clutch, so I cleaned it up and put a different clutch plate in (I have heaps of good clutch plates floating around). I then bolted the engine to the gearbox.
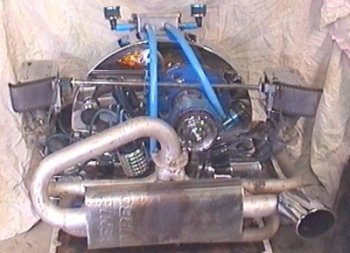
I pulled the exhaust off of the engine. My girlfriend then sandblasted most of it, and I finished off the rest. I also cut the exhaust in a few places and welded in extra flanges, mainly to replace the standard slip joints with something that actually works (I hate slip joints, they slip when you them to stay still and seal, but when you want to remove the exhaust they won't budge).
I installed the peddle assembly, but first I had to repair it. I had noticed that the hook on the clutch cable had almost worn right through the hook on the peddle assembly (you get that after 33years of wear and tear). So I welded some more metal to the worn hook, and ground it to shape.
Since the type II gearbox shifting shaft is 2inches higher, I needed something to step it back down 2 inches to get to the shifter. I have seen Mike Sharps car many times, and seen his preferred method, which I adopted. I got 2 shifter couplings, put one on the gearbox, and one on the shift rod. I then put the gearbox in neutral, the gearstick vertical, held the two coupling together and welded them in place. An easy way to get the correct length shift rod, and a vertical step in one go.
Meegan helped prepare the lift kit for installation. I have decided to use standard body to pan seal rubber on the top and the bottom of the lift kit. Meegan cut all of the rubber to suitable lengths, and then punched all the bolt holes on the rubber.
I also done a few small things like paint brakes and backing plates, adjust all my valve clearances...
More News About My Baja 23rd July 2001
My weekend was not as productive as I would have liked, people visiting, 21st's to go to, it is not very helpful to vw building.
I managed to paint the exhaust system, put the rear brakes together, put most of the front suspension together and rebuild the front disc brake calipers.
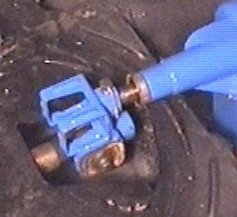
The calipers took forever. I had two small brake pad 68 calipers, and two larger brake pad 74 calipers. I pulled them both apart to find the best bits of both. They all have exactly the same pistons. I wanted to use the large pad calipers to try to get longer pad life. Since they both have the same piston diameter, they should both provide the same braking force.
I polished the pistons with autosol to make them perfectly smooth and remove any stains. It took ages to get the pistons out. I use compresses air to get them out, but be careful because when they do come out they come at with a lot of force and a lot of speed.
More News About My Baja 1st August 2001
My Baja will not be ready in time for Valla, because my friend didn't have the body painted in time :(
So I have been busy getting my L bug ready for Valla instead.
More News About My Baja 3rd September 2001
Well I made it to Valla, and it was really good as usually. Then I came back home, went to Hong Kong (for work) for 10 days, came back for a few days, went to perth for 7 days (for work again) and then came home again. I finally got a chance to start playing with the baja again.
I finished putting the front steering gear together, and done a rough wheel alignment. My mate also finished drilling my stubs to accept type 2 cv's. So I drilled and tapped them.
More News About My Baja 15th September 2001
I have been having a few dramas with my car and my website lately, so it's been a while between updates.
My baja is slowly progressing. I had a friend who was to paint my body, but he had it at a friends house to be painted, but that friend got involved in a high speed police car chase, with weapons in the car, the house got raided, blah blah blah. The excuses I've heard over the last month are ridiculous. So I am getting my unpainted body back, and I am now giving it to someone more reliable to paint it.
But I must say that I now have my floor pan driving around, with the 1915 in it. I have got to say that 100HP in a floor pan is quite a rush. There appears to be something wrong with the gearbox or the shifter at the moment, because I can't engage first gear. But that's probably a good thing. I get 2nd, 3rd, 4th, and reverse fine. It selects first, feels like it goes in, but when you release the clutch it grinds teeth like it's not engaged properly. I got the gearbox professionally rebuilt. It seems to me that it isn't adjusted properly and has been built wrong. I will take it back and see. More hassles though.
Last weekend I went for a ride in my dad's mates GTS dodge viper. A 450HP 12 second car is something to be experienced. When he squirted it in any gear it went, and tried to spin the wheels at any speed, any rpm, any gear. I calculated how fast the floorpan would go with the 1915 in it. I figured about 400kg, 100HP, not much drag, should be good for around a 12 - 13s quarter.
I put the floorpan in second and started driving. I lined it up down the driveway (we have a 1-200m bitumen driveway) and gave it a squirt in second. Holy s**t, it's fast. I have never driven a car where the back wheels are trying to spin at the same time that the front wheels are trying to lift. I have never driven something that I was too scared to completely rev it out in gear. As soon as you get a bit of speed the stiff suspension bounces you all over the place. But jeez it's fun.
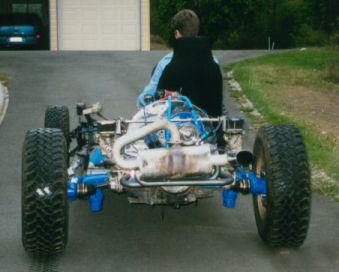
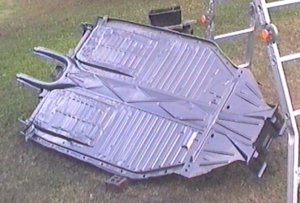
Rear view
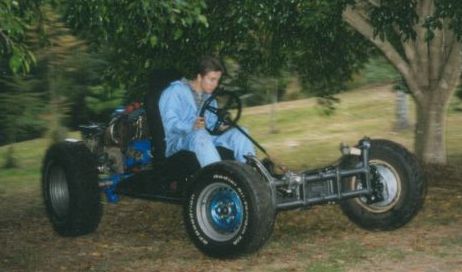
Here's me driving the front up onto a large rock, with the other front wheel up in the air.
Here I am ducking the trees. The throttle got stuck open a few times which was a bit of an adrenilin rush.
More News About My Baja 23rd September 2001
I took my gearbox back. They thought my problems sounded pretty weird. They thought a bracket under the nose cone that is prone to breakage on the kombi box was broken, but it wasn't. They replaced it with a beefed up version for me anyway for all my hassles.
They eventually found that they had simply adjusted the first gear engagement depth incorrectly when they put it together. He said it was the first time he'd done that in 17 years. I guess I'm just lucky. So he put it back together with a new gasket kit and everything for me. It's just a pain because I had the gearbox nicely painted before, and now I have to either touch it up or do it again. So the gearbox should be in and working properly this weekend.
Hopefully my body will get delivered, to a new guy who is going to paint it, this weekend. He said he'll take a week to paint it. So it should be painted by the end of the month.
More News About My Baja 1st October 2001
I'm trying to get back into the weekly updates groove. Over the weekend I basically just started putting the gearbox and engine back in the car. The engine is in and bolted up, I just need to wire it up and test drive it again. I have put the gearbox in each gear and rocked the car back and forth and all the gears appear to be there which is a good sign.
I also decided to try a different method for making the throttle cable step around the gearbox. I decided the friction and drag in the metal zig-zag tube I made for the throttle cable was probably the reason it got stuck on a couple of times. I decided I needed a standard late model throttle bowden tube. Unfortunately you can buy them anymore (or I was told). But I found a good second hand one. It was a bit short so I needed to slightly extend the one in the fan shroud. Hopefully this will fix my sticking throttle problems.
Most of my weekend was taking up transporting cars. I left at 9am sunday morning and got home 5:30pm sunday arvo. I had to go north, pick up the car trailer, go further north, pick up my partly panel beated baja body, go way south and drop the baja body off at Bill's house to be painted. Bill is retired so he can put all his time into the car. Hopefully it will be painted within the next two weeks. Bill had completely stripped both the doors of paint already (I dropped the doors and baja kit off on thursday). I was surprised that the doors had absolutely no rust at all in them. Pretty good considering all the trips up the beach so far, and the fact their 33 yrs old.
Then we headed north again, picked up a '58 body and floorpan on the way through (maybe a future project of mine or Rhys's). Then we dropped the 58 off at my house, continued north to drop the trailer off, then north further to drop my friend off, and then finally home.
This weekend coming I will be getting the pan ready to have the body bolted straight on.
More News About My Baja 8th October 2001
I got the pan drivable once again on sunday. I spent quite a long time welding an extension onto the throttle bowden tube, but it was worth it. The throttle works really smooth now, and I didn't have any problems with the throttle sticking. It took a long time because I had to weld a bigger diameter tube, then a smaller dia tube, then another big diameter tube end on end onto the original bowden tube. I had to do this to make the fan shroud throttle tube fit nicely into the tube extension.
I took my mate rhys for a drive around the yard on the floorpan. He just laid on the the passengers side of the pan and held on. I got him to hold the kill switch so if the throttle got stuck again he could switch the engine off real quick. I took it down to the grass first. I gave it a squirt in first, acceleration and wheelspin. Then into second, acceleration and wheelspin. Good fun but Rhys was a little scared.
Then we went to the bitumen. I gave it a squirt in first and we started accelerating real fast, we got part way through the rev range and I got a little too scared to rev it all the way out (I didn't want to know what happens when it comes on power in first). So I short shifted it to second and got on the power again, more underwear browning acceleration. I backed off the throttle with a smile on my face and looked down at the passenger side floorpan to make sure Rhys was still there. He looked up and said "that's crazy". I know, I love it.
I get the doors and fiberglass kit back from the painters this weekend, and the body back next weekend.
More News About My Baja 15th October 2001
Not much happened this week. I just continued getting the pan ready to have the body bolted onto it this weekend. I got all the fiberglass kit back on thursday. It looks pretty good. It's not the colour I was originally after but it's still pretty cool. I was hoping to put a picture up but I forgot to take one (doh!).
I made the last 6 pieces of my lift kit. The 6 bits between the shock towers and the body. I also made another mod to my front gearbox strap to stop it sliding backswards on the nose cone. I covered the inside of the pan with sound deadener, and fitted as much of the lift kit as I could.
More News About My Baja 22nd October 2001
I went and picked up the body on saturday morning. I decided to take the floorpan down to Bills house so that we could bolt the body straight on the pan while we were down there. That way I didn't have to tie the body to the trailer.
It was a bit of a hassle to fit the pan on Brads trailer. Brad made the trailer just big enough to fit a beetle on, so my baja's mud tyres hung over the side of the trailer. I decided that probably wasn't real safe and had to put stockies on the back to fit it on the trailer. The trailer had other issues like broken floor plate welds and tail lights that didn't work, and the worst part no shocks at all. It made it an interesting trip.
We lifted the body on while the pan was still on the trailer. It was a bit tricky, but we did it without wrecking anything which was good. Trying to get all the bolts through all their holes was a different matter. Trying to line the pan to body holes up on a stock vw is hard enough without trying to get the bolts through a 2 inch lift kit at the same time. I use windscreen sealant on the body to pan seal rubbers, and ended up getting the stuff everywhere. We got a few bolts in, then gave up and decided to take it home to do the rest.
Once I got it home I decided to use a bottle jack between the chassis tunnel and the body to try to help line the bolt holes up. This technique worked very well and I managed to get all the lift kit bolts in. I am very happy with how the lift kit turned out. It was the perfect size, all the corners lined up perfectly and there are no gaps anywhere.
I will have to try to get a picture up soon.
More News About My Baja 30th October 2001
Sorry I'm a day late with this weeks update, I was too busy yesterday.
This page is starting to get a bit long and is probably causing older computers to crash, but I'm not going to change it just yet. I have a new website location sussed out and I will change everything when I move there.
I didn't get too much done over the weekend, as I went 4x4'ing to Mt Mee with some mates in their Range Rovers. I could feel the itch to go offroad in the baja real bad, I wish it could've been there :(
I cut the hole for the steering column, and I have been playing with that quite a bit. I've been trying to work out where I want to mount the steering wheel. I can either space it 2 inch below the dash, and have it inline with the steering box, or I can raise it 2 inch to sit back flush with the raised body (and dash). But if I raise it, then it will be higher than steering box and the standard rubber coupling will have to flex more than it normally would. So I thought about using a universal joint in the steering shaft.
So I spent about an hour (or more) on sunday trying to pull the univeral joints out of an old green L bug in the back yard. Unfortunately large ants had decided to make their home in the bolt holes of the steering box and the steering shaft tube. So trying to take everything apart was quite dangerous. There was also some venomous spiders hiding around the place, so I didn't want to lie on my back under the car in the grass to try to get the steering coupling off. But you have to get under the car to get to the steering coupling? That's what you think.
I went to the shed and got some wreckers tools. A large hammer, a metal chisel, and an vw axle (used for hitting things). In a short period of time I had cut a large hole in the body using the hammer and chisel, and could now get the the coupling from above. I also cut myself on an old cut brake line which hurt, and is a good way to get an infection.
And after all of that I found that the splines on the L bug and beetle steering boxes are different and I can't use the universal joints anyway, DOH!
I also spent ages cleaning the old glue and insulation off of the hood lining and rear luggage area in preparation for the new hood lining to be installed by a friend of a friend this saturday. It took hours and I think I probably now have aspestos poisoning. Fine insulation particles ended up everywhere.
I also installed a few seals and things in the doors, and trial fitting the rear mud guard just to see the tyre to guard clearance and get an idea of how it will all look.
More News About My Baja 31st October 2001
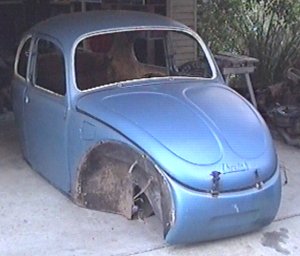
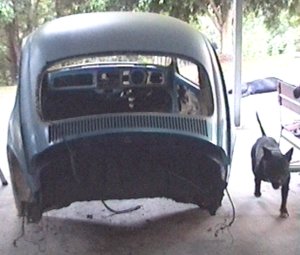
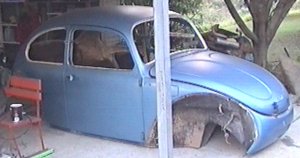
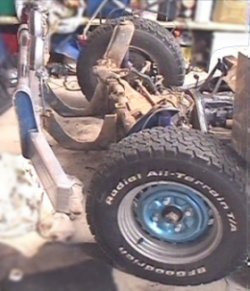
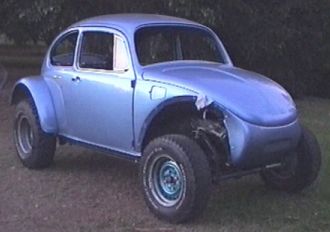
I told you I'd get some pics up soon.
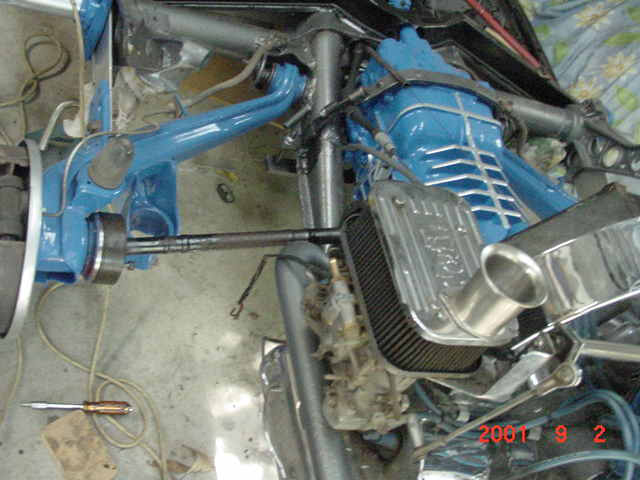
You can see how the engine sits further to the right now with the kombi gearbox (note airfilter to body clearance either side)
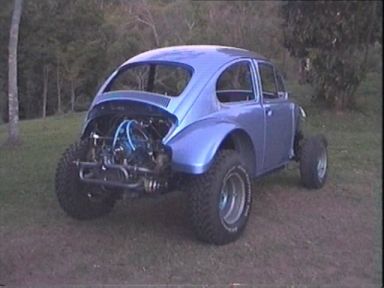
Tyres to guard clearance isn't too bad.
More News About My Baja 5th November 2001
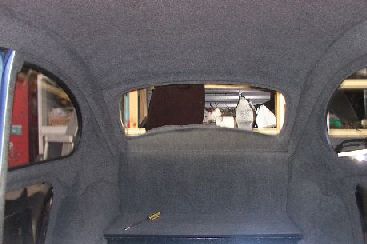
During the week I finshed painting inside the cargo area and inside with black kill rust in preparation for the hood lining.
Then on saturday morning Rod came over and covered my roof and cargo area in a mid grey marine carpet type material. He did a real good job, and quite quickly too. Then me and my mate Dave put my 4 permant windows in the car. Putting in windows is an absolute pain in the bum. Especially with new stiff rubber window seals. Now I can start putting most of the interior back in the car. I just need to weld up the relocated steering column hole and then the steering column part of the body lift kit will be completed.
Hopefully it'll be on the road in two weeks.
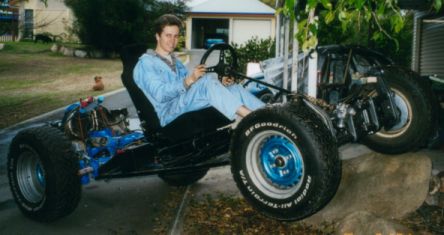
Thought I'd add a piccy!
More News About My Baja 13th November 2001
For more news about my baja, please go to my new site.
Straight to Baja Rebuild Diary
Offroadvw.net home, with links to my new site.
|